

Lino printing can be used to make so many different items; from a simple birthday card, to a unique and personal print to hang on your wall. Once you’ve carved your lino stamps, you can use them over and over again to make oodles of beautiful, handmade creations.
To get started with your first stamp, you will need a few tools;
- Lino
- A brayer (Ink roller),
- A carving tool
- Ink (specifically for fabric or paper)
- A surface for rolling out ink
If you’re just starting out you can buy a beginner’s kit online which includes all the basic equipment and a variety of lino choices to practise with. When I started I bought the Essdee kit which was good to learn the ropes of lino cutting and includes some good cutting tools which are featured in the images below, however, as I have progressed and explored using different tools I have found the ones which I find work best for me:
L i n o :
I like Soft Cuts lino, this has the consistency of plasticised rubber, it’s smooth to cut and is very hard wearing so won’t lose definition over time. I also really like Speedball Easy Carve, this is incredibly easy to cut and makes really even prints, it is however, more expensive that the SoftCuts but is great if you want to use ink pads instead of rolling your ink.
I n k :
For card prints I use Caligo Safe Wash Relief Inks which are oil based and, unlike other inks, they don’t dry out, so you can take your time with printing without worrying about your ink drying up and wasting it.
For fabric printing I use Speedball Fabric Block Printing Ink. This is the only ink I have found so far that is specifically for printing on fabric. It works well and once the fabric has dried and been washed the colour remains highly pigmented and doesn’t wear away. I have tried using the Caligo ink on fabric and, as long as you allow a long time for it to dry before washing it (7 days) it too works well, but I prefer the Speedball Ink for fabric.
C u t t i n g T o o l s :
I use Pfeil tools,these are professional tools which are incredibly sharp and precise and come in a lot of different gouge shapes so you can choose the perfect tool for the project your working on. These are more expensive than the ones you can buy from Essdee and other suppliers but if you’re going for precision and delicacy with your carving, Pfeil is the way to go.
B r a y e r s :
I use a 10 cm Essdee brayer for larger prints and a 6 cm CWR brayer for smaller more precise prints. Both are great tools, I think when it comes to brayer, personal preference and the size you’re after matters more than the brand.

(Left to Right) Small Brayer, Large Brayer, Soft Cuts Lino, Pfeil Tool, Speedball Easy Carve Lino, Caligo Safe Wash Relief Inks, Speedball Fabric Block Printing Ink.
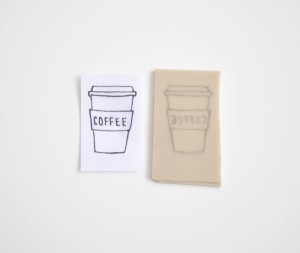
You can make a stamp in the shape or design of virtually anything, I suggest you begin by sketching out what you want to make a print of on a piece of paper first, so you can get the design and sizing right.
Once you’re happy with your print, take the paper and flip it over onto the lino block and using a hard pencil rub the design onto the lino. Make sure that you use a pencil to draw your design on the paper so that it will easily transfer onto the surface of the Lino. (Don’t worry about the design being reversed on the lino, as when you print you will be flipping the design back to how it looked on the paper). If you need to, go over the outline on the surface of the lino in pencil or pen so that you can see the design clearly.
You can then move on to carving, in the kit you may be provided with a beginner’s tool, this is designed so that you can’t cut too deep and mess up your design. While this tool may be helpful for some, I personally found this tool really difficult to use as you can’t see where you’re carving and how deep the line you’ve carved is. I found that the smallest tool is much more user friendly. If you’ve never done any carving or cutting before I would suggest you start out using the beginner’s tool on a scrap piece of lino until you feel you can control the blade. Remember, you want to cut away the part of the design that you don’t want to be coated in ink.
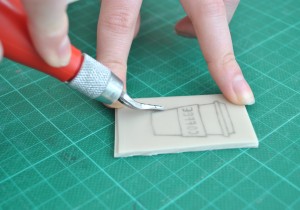
Essdee Cutting Tool, Soft Cuts Lino
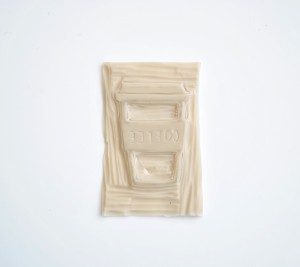
Once you’ve carved your design, you can take a larger cutting tool and remove bigger areas of lino that you don’t want to be inked. When you feel that you are happy with your design you can move onto the inking.
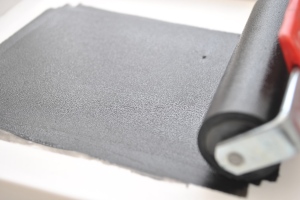
You’ll now need to roll out some ink, I have found that using a glass chopping board or something hard wearing and smooth works best as some of the plastic inking boards that you can buy have the tendency to warp which prevents even ink coverage.
Getting the right amount of ink on your brayer can take a while to perfect, when I first started I ended up either using way too much or way too little. A good way to tell if you have the right amount of ink on your brayer is to get it to a consistency where it looks like orange peel, it should also make a sticky sound when you roll it. To evenly cover the brayer, make sure you make even strokes that go from top to bottom, top to bottom and not just forwards and backwards or you’ll only cover half the brayer in ink.
Once your brayer is coated in ink, move on and roll it, in the same way, onto your stamp. You can go in all different directions to make sure all of the stamp is covered as this won’t show up. Again, you’re looking for an orange peel effect on the stamp, this may take a few rolls to achieve.
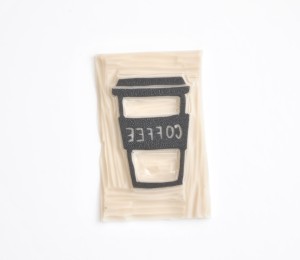
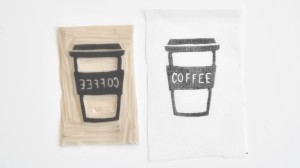
After inking the lino, place the stamp onto the paper or fabric and push down on the back with your fingers. A technique that I have found works really well when working with fabric is to add a little tape to either side of the lino to secure it to the fabric and then flip the fabric over. This way you can push the fabric onto the inked lino to ensure even ink transfer. To make your print even more opaque and crisp you can use the back of a big metal or wooden spoon and smooth it across the fabric.
Once you’ve made sure all of the stamp has come into contact with the fabric or paper you can flip it back over, take off the tape and slowly remove the stamp.
If you’re working with paper, you probably won’t need to tape it down and flip it as ink will adhere much more easily to paper or card than it will to fabric.
Working out how much ink to use, the pressure to apply to ensure an even print and finding a look you’re happy with can take time to perfect, but after some practise you’ll find a technique that works for you.
Once you’ve made a print you’re happy with, you will need to leave the fabric or paper to dry. Check on the label of the ink you’re using for the exact drying (and washing instructions), but the Caligo Ink takes about 5 days to dry and the Speedball block printing fabric ink needs 5 to 7 days to dry and then the fabric can be washed.
I put inked fabric in the washing machine on a rinse cycle for about half an hour and then shake and leave it to dry, you can pop them in the tumble dryer if you’d like but check the washing instructions of the fabric first.
These basic steps are all you need to get started and once you’ve perfected your rolling and stamping technique, you can start creating bigger, more detailed designs.
E x t r a T i p s :
• Practising your prints on scrap fabric before you print onto the real thing will help to avoid uneven and pale prints and will save you from ruining your fabric with prints you can’t use.
• Make sure you ALWAYS cut away from your hands and body as the cutting tools are very sharp and cause a lot of pain if jammed into a thumb.
• Make sure you know exactly what areas you want to cut out as once you cut you can’t go back. Check twice, cut once.
B E F O R E Y O U S T A R T :
Make sure that you wash your fabric, I know that this may seem like an annoying step, but trust me, if your fabric is unwashed it may have a coating on it that prevents the ink from sinking into the fibres of the fabric and when you wash it, it will wash away and fade. Also iron fabrics that are particularly creased after washing.
